Creating visualizations of architectural designs has long been a very tedious process. Finding a way to make the procedure more efficient can help you quickly craft beautiful, sharply accurate visualizations while enhancing client engagement and cutting down project costs.
The Enscape real-time rendering tool offers many features that can help you streamline your architectural visualization workflows. Let’s take a look at some below.
Seamless Software Integration
As a plug-in software, Enscape can be effortlessly integrated with your existing CAD and BIM software (Revit, SketchUp, ArchiCAD, Rhino, Vectorworks).
After installing Enscape, you can open your CAD/BIM program to integrate the plug-in. Setup varies depending on the software you are using. For example, in Revit, Enscape will show up in the top-level menu bar when you open a project file. In ArchiCAD, the Enscape plugin can be found via the ArchiCAD -> Window -> Palettes menu.
All of the updates you make in your CAD/BIM files will be immediately reflected in the Enscape render. No need to export and import files to make changes!

Instant Renderings
Being a plug-in means that all functionalities of Enscape will be readily available in your CAD/BIM tool, so there is no need to go elsewhere to build the renderings. You no longer need to use an offline renderer or rack up more project costs by outsourcing.
Create renderings within seconds, generating single images or batches based on specific views and perspectives you’ve saved as favorites. To do this, you’ll first need to ensure that the Enscape window is active, then adjust the resolution of your rendering. Note that if you select a very high resolution, the rendering may take longer than just a few seconds.

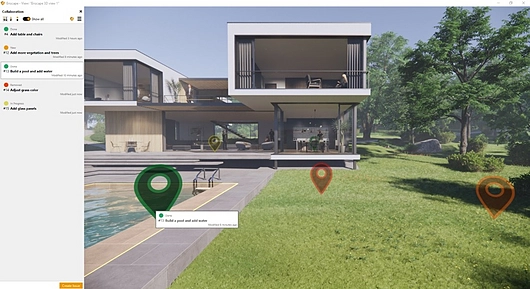
Collaborative Annotation
Collaborative annotation is a new feature launched with Enscape version 2.8. It was created to meet your need for easy collaboration and commenting on your 3D models.
Your team can quickly mark down questions, clash observations, and RFIs (requests for information) as “issues”. With the Enscape window open, simply press the “C” key on your keyboard to create a new note, or right-click on a point within the Enscape view to make a note at a specific position.
BIM Display
Time lost by switching between software is further reduced by Enscape’s BIM mode (Note: available only for Revit and ArchiCAD). See your BIM information directly in the Enscape window via the BIM information panel. This can be opened by pressing the “B” key on your keyboard.
You can see BIM data by searching for specific elements within the BIM panel, or mousing over elements within the view window while the BIM panel is open. Another option is to right-click visible elements and select “Show BIM Data”.
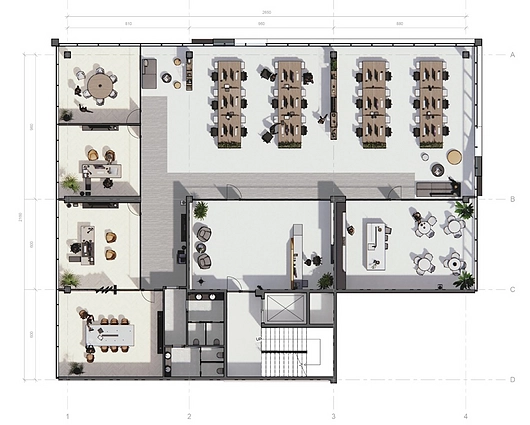
Orthographic Views
Using just CAD programs, you’ve likely had to completely re-draw your models to make 2D views. Thankfully, swiftly creating floor plans and cross-sections is possible with Enscape.
Setting up orthographic views can be done by selecting the option among the icons in the top right corner of the Enscape window (press the “H” key if it is not immediately visible).
You can easily shift perspectives using the NumPad keys 2 (front), 4 (left), 5 (top), 6 (right), and 8 (back). In SketchUp and Rhino, you can also sync the Enscape camera with your in-program viewport. Accessing section views varies depending on the specific software you’re using.
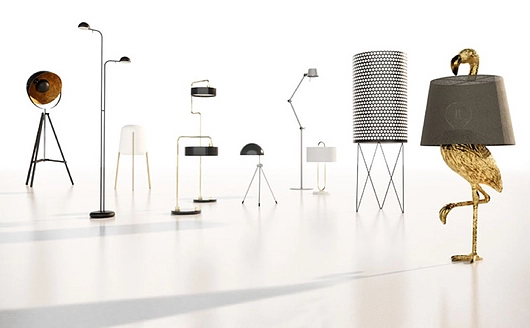
Asset Library
Bringing your visualization to life is easier than ever with the use of over 1,900 high-quality ready-to-use assets. Enscape’s asset library is accessible in your design program, featuring everything from people and vehicles to even animated vegetation. The latter features wind speed controls and adjustments for degrees of movements (accessible via Enscape’s “Visual Settings”).
Panorama Creation & Exporting
No more stitching together countless photos of your project. Use Enscape to easily prepare 360° panoramas in both stereo and mono. In the Enscape menu, simply select “Render Panorama”. You will also have the option to render for Google Cardboard.
Saving your panoramas in the cloud will allow others to view them in the web browser via URL links or QR codes. Otherwise, panoramas can be saved as downloadable .png, .bmp, .jpg, .jpeg, .tif, or .tiff. files. To manage your panoramas, locate them within the “Manage Uploads” tab of the Enscape menu.
Virtual Reality Walkthroughs
Once you’ve completed your 3D render, you and other stakeholders can explore it in virtual reality. Compatible headsets include the Oculus Rift, HTC Vive, and Samsung Odyssey. Exact setup protocols differ depending on the type of headset you’re using.
Enscape VR has many useful features, including a presentation mode, teleportation between all visible locations, navigation and floorplan maps, and a virtual camera for capturing images during exploration. These tools enable rich interactive experiences with your design before it’s even built.
Video Animations
Enscape’s video editor empowers you to quickly craft high-quality videos of your 3D model. Open the editor by pressing the “K” key or clicking the Video Editor icon in the Enscape menu bar.
Smoothly set camera paths, adjust the time of day, change view depth and angle, and alter timestamps. Once you’ve finished creating your video, it can be saved as an MP4 or a series of PNG still image files. You will be able to control the compression rate to make your video file suitable for any application, from email sharing to high definition presentations.
Free Trial Version
Enscape offers a 14-day free trial. Visit and discover Enscape here.


