Enscape is the easiest and fastest way to turn your models into immersive 3D experiences. By plugging directly into your modeling software, you are given an intuitive visualization and design workflow to utilize.
The release of Enscape 3.0 included a redesigned user interface (UI) with improved functionality. Here are some examples of how the new UI can complement your everyday workflow.
Improving the product experience with a redesigned UI
A redesigned UI brings consistency and provides you with a better workflow. The changes made were based on customer feedback considerations.
The way you will use and experience Enscape has improved in the following areas:
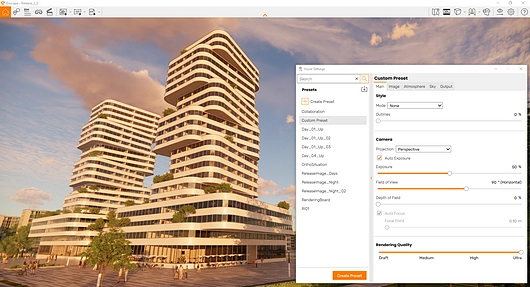
- Improved visual setting workflow management
- Relocation of functions from the plugin toolbar to the renderer toolbar
- A new structure for displaying information in the renderer
- A new video timeline view and a change to video keyframes: V = video editor and K = keyframe
Enscape is popularly known as being a tool that can be used without prior specialized knowledge. And now, with this UI overhaul, the real-time rendering tool is even simpler to use.
Relocation of functions for a better design experience
To help enhance your rendering workflow, a few commonly used features were moved to the Enscape rendering window to give users better access. These included the exports, video editor, virtual reality, and visual settings management.
The Create View and View Management functions were moved from the CAD application to the Enscape window. This gives you a more fluid way to present projects.
Settings Presets and View Management have also been improved to make the process of linking a View to a Settings Preset easier. It also improves the Batch Rendering workflow.
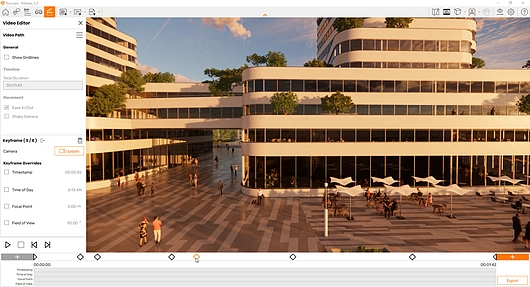
An improved video timeline view and keyframes
Video creation and editing has gotten a whole lot easier with the video editor’s new streamlined workflow. You no longer have to go into sub menus because all aspects of the video creation process are now clearly visible. There is also a new timeline view for faster and easier video creation and editing.
The editor is accessible via the hotkey 'V', and keyframes can be added by pressing 'K' or via the new ‘+’ buttons on the timeline. You have better visibility and control over the time of day, the camera's focal point, and field of view, all of which are still indicated on the camera path but can also now be viewed on the timeline itself.
Getting started via the CAD User Interface
To open and start Enscape, you have to access it via the user interface (UI) of the CAD you’ve installed Enscape for. This example uses the Enscape Toolbar in the SketchUp user interface.
The Enscape Toolbar has been adapted in style to conform to the user interfaces of the other supported CADs which is why it will be almost identical as those shown here.
Along with the buttons to launch Enscape, enable its Live Update and Synchronize Views functions. This CAD-side toolbar also provides a way to access core Enscape functions and options without having to start Enscape, which includes the License Key activation, Performance options, Language, and Network settings, as well as access to a form to contact Enscape Support if you run into any problems.
The Enscape Toolbar in the SketchUp user interface
Press the Enscape Start button, located on the Enscape toolbar, in your chosen CAD to open the Enscape viewport. Then load one of our free Enscape Sample Project files for your CAD.
When Enscape opens for the first time, a row of buttons running across the top of the Enscape Viewport should appear. If they don’t, then click the small orange chevron located at the top middle of the Enscape Viewport to expand it.

Expanding the Enscape Toolbar
On the right of the Viewport, you will see a contextual Help panel to assist you in becoming comfortable and familiar with the Enscape user interface and its layout and associated functions.
The Help panel can be easily opened and closed using the [H] key or with a mouse click.
Video tutorial
To learn more about Enscape’s new redesigned UI, check out the “Introduction to Enscape 3.0” video tutorial.
If you want to start visualizing and designing intuitively, then take out a free 14-day trial with Enscape today.


