Placing an independent image in Revit is done using the decal command. This is a great way to present framed art and other embellishments in renderings. Decals are supported in Enscape's Real-Time Rendering environment, including panorama and Virtual Reality. This guide will show several examples of decals placed in Revit models and how they help to create a more realistic image in Enscape through context and clutter.
USES FOR DECALS
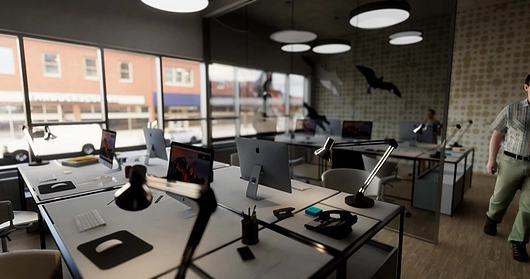
When LHB was designing its new LEED® CI Platinum office space in Minneapolis, Several rendered images were created which included many decals in Revit:
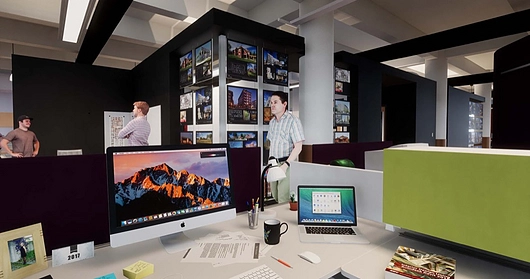
- Computer monitors
Each screen has a different image for added realism - Marketing boards
Firm projects on aluminum panels suspended with aircraft cable in front of glass panels - Exit Sign
This was added over a linked MEP model element - Printed project drawing
An image of a print from a real project for added realism - Television screen
An image from the current lobby graphics at the time - Sketch pin-ups
Scanned sketches to make the space look “lived in”
Decals, like Revit materials, are externally referenced material. Thus, the images must stay with the Revit model or they will appear missing when the model is opened.
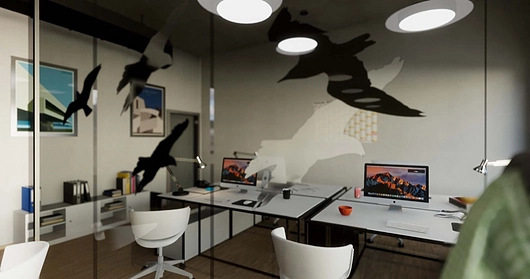
DECALS WITH CUTOUTS
In the image below, the posters on the wall are decals, as are the vinyl bird graphics on the interior glass wall. These bird graphics use the decal Cutout feature.
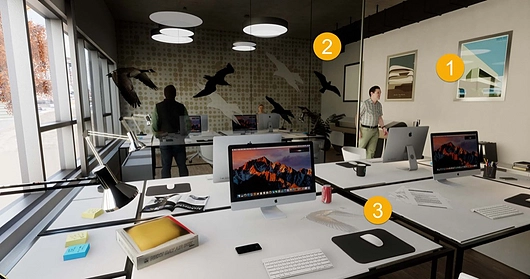
- Framed Artwork
Each frame has a different image for added realism - Vinyl Graphics
Used for wayfinding, signage, aesthetic effect - Transparent Graphic
Special example of transparent decal - (not seen in this image) Site Context
Photo of adjacent existing building
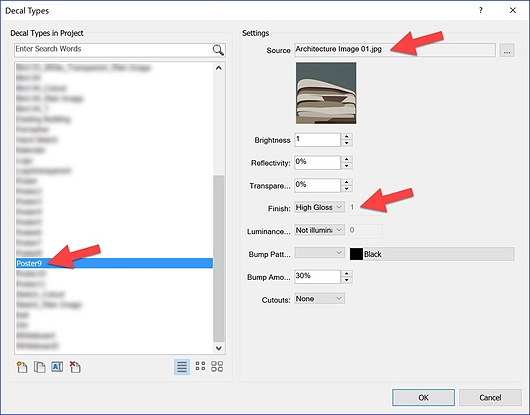
Here are the settings available in Revit’s decal types dialog. The main settings for the wall poster example are the external image to use and the Finish; Matte, Semi-gloss, Gloss, High gloss, custom.
| Decal setting for wall posters |
 |
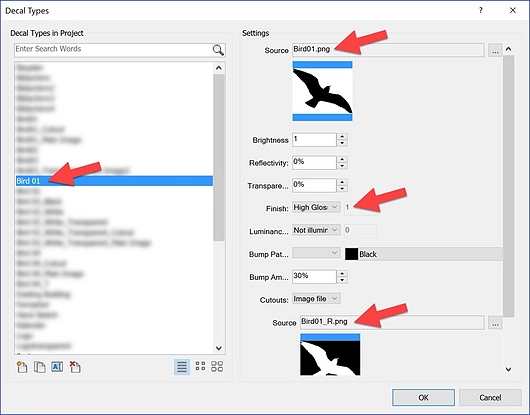
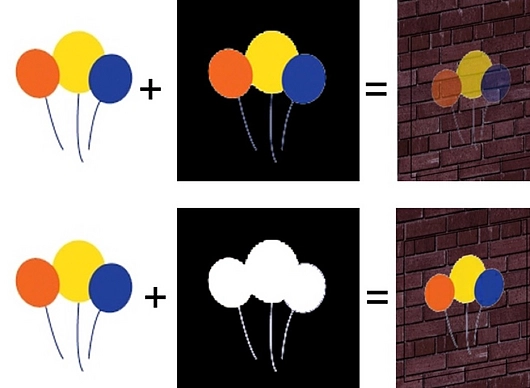
The main settings for the vinyl bird graphics are the external image to use, Finish; and another external image to use for the Cutout. In the cutout image, black completely removes areas from the first image and other colors add various levels of transparency to the original image. Note, that any transparency in a PNG file is not used in Revit or Enscape in the context of decals.
| Decal setting for bird cutouts |
 |
The next image shows the same decals plus a very large one outside the building. This decal uses a photograph of an actual adjacent existing building to provide more realism. This Enscape generated image has the Depth of Field value adjusted to slightly blur out the background.
| A different perspective on office showing decal of the adjacent building |
 |
The various effects of the decal’s Finish settings can be seen in this next image. Plus, the white bird is slightly transparent as it uses a cutout with a black outline and a gray center, not white. Another decal is used to add the calendar on the back wall. You can partially see the calendar through the white bird. The birds set to a High-gloss finish are reflecting their surroundings.
| Multiple decals with different transparency and glossiness |
 |
| This example shows the decal result on a brick wall rather than glass. |
 |
DECALS AS SITE CONTEXT
You can use decals to represent the entire facade of a building, similar to what can be done in SketchUp. You cannot stretch the image out of a rectangular shape, but that could be done in Photoshop. This is great for representing adjacent buildings. Portions of the image not filling the Decal’s host are not visible as shown in the next two images.
Notice in the first image below, adjacent buildings are showing up above the principal building. We could crop this out in Photoshop, but as you will see in the next image, it is not really necessary.
| Facade of a building used as decal | Decal adjusted in properties |
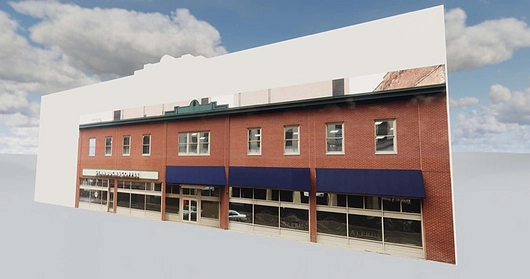 | 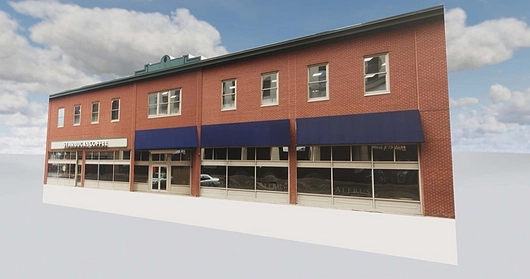 |
When the Decal is selected, its corners can be dragged to change its size. The width and height values are also editable via Revit’s Properties. Notice the portion of Decal above the building is not visible as it is outside the simple extrusion representing the adjacent existing building.
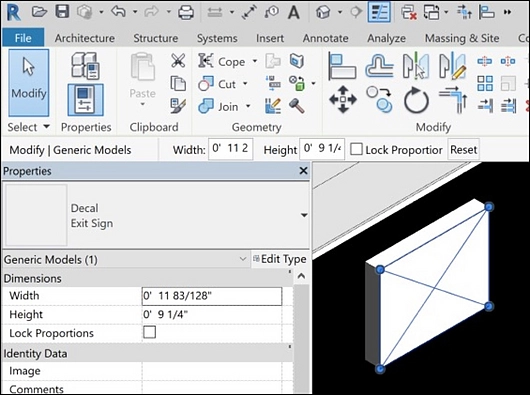
DECAL DETAILS
Here is an example of the properties available when a Decal is selected in Revit. Notice the Width and Height are shown in Properties and on the Options Bar.
| Width and height settings for decals |
 |
CONCLUSION
It is easy to see how Decals in Revit can add to the realistic and lively nature within Enscape's Real-Time Rendering and Virtual Reality environment.
Please find the complete guide on Enscape's website.


