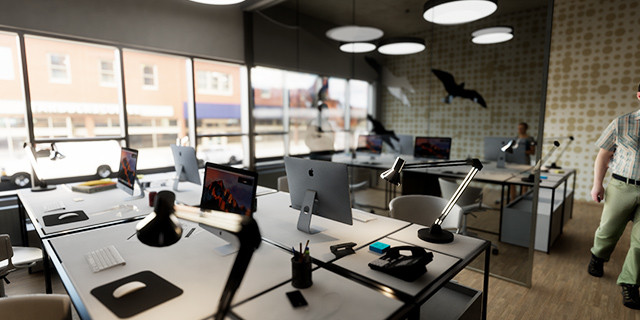
9 Ways to Make Your Renderings More Realistic

9 Ways to Make Your Renderings More Realistic

In a world where autonomous vehicles, artificial intelligence (AI,) Internet of Things (IoT,) virtual reality (VR) and augmented reality (AR) are becoming commonplace terms across the globe, the average AEC client will soon expect consistently high-quality presentations and renderings throughout the design process.

Many people are already anticipating future demand for these technologies, but few are prepared to integrate them with each other. Enscape has developed a system combining several of these features to create lively, immersive, and unforgettable experiences for clients.

9 Ways to Make Your Renderings More Realistic - More Images+ 14

1. Know Your Lighting

Errors in rendering daylight are immediately apparent to even the untrained eye. Given this and the importance of daylighting in energy-efficient buildings, the importance of accurately rendering daylight cannot be overstated. The first step with Enscape is to select the project Location on earth and specify True North to ensure accurate conditions

Accurate daylight for exterior. Image Courtesy of Enscape
Accurate daylight for interior. Image Courtesy of Enscape

As many studies have shown, daylight has a profound impact on human health and productivity. Therefore, we should always keep lighting in mind with a holistic design approach. It is helpful to know that we as designers can accurately represent our design solution’s lighting effects during design and presentations using Enscape’s real-time rendering engine. And this applies not only to daylight, but also to artificial light when using manufacturer-provided photometry (IES files).

2. Looking Past the Horizon

There is nothing worse than seeing a simple, flat, horizon line in a rendering - it immediately appears artificial. That said, it’s a very common mistake, and one that has been difficult to avoid. Using horizon presets allows you to give a more accurate impression of what the external surroundings might look like.

Scene with skybox selected. Image Courtesy of Enscape
Uses photograph of adjacent existing buildings. Image Courtesy of Enscape

You can also use a custom skybox downloaded from OpenFootage.Net, and adding it using the Enscape function “Skybox as a background”. OpenFootage has many background options, making it easy to render backgrounds accurately.

Why is this better than simply using Photoshop? Firstly, as the design develops, the image remains. Secondly, the same background will be visible from different rooms and angles, saving time in the rendering process.

3. Use Advanced Textures

Whether you are using Revit 2019’s new advanced materials, or the similar results one can achieve with Enscape’s material editor, it is always a good idea to develop and use high-quality textures. The two examples are shown below highlight the rich and lively effect high-quality textures can have.

Courtesy of Enscape
Courtesy of Enscape

If you have Autodesk Revit installed, you can access a wealth of textures installed on your computer’s local drive here: C:\Program Files (x86)\Common Files\Autodesk Shared\Materials\Textures\3\Mats. Also in this folder, you will find files to support the new advanced materials, such as ‘norm,’ ‘refl,’ ‘rough.’

Also, check out websites that offer free high-quality textures such as https://www.sketchuptextureclub.com and https://megascans.se.

4. Mind the Bump!

When developing materials, remember to apply bump maps as it has an immediate impact on the quality of the material and overall image. For example, look at the subtle shadow lines added at each brick in the image below. Or, how about the fabric that looks so comfortable on the sofa and ottoman, plus the impressive woodgrain with highlights in the flooring?

Bump map used for masonry (Revit). Image Courtesy of Enscape
Bump map used for wood and textiles (SketchUp). Image Courtesy of Enscape

The importance of using bump maps cannot be over-emphasized. It is the difference between recognizing an image as a rendering and believing an image is a photograph.

5. Architecture is for People

It should be no surprise that architecture looks more realistic with people and clutter in it. The two images below speak for themselves: acceptable versus believable!

With people and clutter (lively). Image Courtesy of Enscape
Without people (plain). Image Courtesy of Enscape

Using RPC content can transform an image from great to amazing. There are some libraries with free and paid content that help you to add people to your architectural project. With some effort, you can achieve even more of a reality boost by using custom RPC content. Also have a look at the overview of more free resources for architectural projects.

6. Reality does not mean being perfect

In reality, things aren’t perfect. So it can help your composition to rotate a chair, add a soda, or place a magazine. Once you place your entourage, rotate the items slightly in random increments. For plantings, also change the scale slightly for each instance.

A naturally folded napkin and a can of soda. Image Courtesy of Enscape
Desk clutter randomly rotated. Image Courtesy of Enscape

7. Proxies are your best help for large projects

To help with performance in your model, use proxies. These complex elements appear as simplified objects e.g. in SketchUp and then are replaced with much more complex geometry and materials in Enscape. In the two images below, the SketchUp model has another entire SketchUp model placed as a proxy. When Enscape is opened, the referenced SketchUp model is used. The bookcase with clutter, by itself, is a 16MB file with 106k edges, 43k faces, and 52 materials. As you can imagine, the simple wireframe box will make your main SketchUp model perform a LOT better.

SketchUp model with proxy placed. Image Courtesy of Enscape
Enscape with detailed model used for proxy. Image Courtesy of Enscape

8. Find the right view

Finding the perfect perspective is an art. But there are a couple basic rules that can help. First, compose the view from a human vantage point. Second, avoid aligning or overlapping geometry which can create the potential for confusion. Next, frame exterior views with vegetation if possible, such as a tree branch in the foreground. Finally, avoid foreshortening a plane, like an adjacent wall, as this can misrepresent the proportions of a space – simple shift the vantage point to the left of or right to see a little more.

If nothing else, just taking a moment to step back and review the composition of the view can reveal issues which can be easily fixed. And with all of this in mind, one of the easiest uses of Enscape is its ability to make subtle adjustments in real-time, so you can quickly find that perfect perspective.

Poor Composition. Image Courtesy of Enscape
Improved Composition. Image Courtesy of Enscape

9. Fine-tune Your Perspective

With a well-developed model, it is now possible to add one more layer of refinement: depth of view and field of view. These two features create results that mimic a physical camera, which can leave many wondering if the image is real or CGI. The field of view defines how much of a scene is visible in the given view. A wider view helps to make up for a lack of peripheral vision, but it’s a balance - the wider you go the more distorted the image gets. The depth of view, simply, is what causes the background and/or foreground to be blurry. It is not practical to represent all clutter or blemishes in a real-world setting; using depth of view to slightly blur targeted portions of your scene can help build an overall sense of realism.

Conclusion

Do not be satisfied with average results. Take advantage of these nine steps to create more realistic renders. With these in hand, you will create excitement in even the most mild-mannered project stakeholder!

Use Enscape software and these techniques on your next project to impress everyone involved, including your competition! Consider it a compliment when someone asks “What software are you using?”

About the Author:

Dan Stine is an Author, Blogger, Educator, BIM Administrator, and Wisconsin registered architect. He works full-time at LHB – a 250 person full-service design firm.

Cite: "9 Ways to Make Your Renderings More Realistic" 27 Sep 2018. ArchDaily. Accessed . <https://www.archdaily.com/901111/9-ways-to-make-your-renderings-more-realistic> ISSN 0719-8884

You've started following your first account!

Did you know?

You'll now receive updates based on what you follow! Personalize your stream and start following your favorite authors, offices and users.