How to Use a Drone to Create a Detailed 3D Context Model

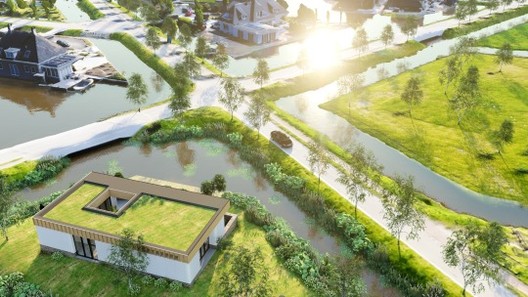
While working in 3D-visualization software such as Lumion, features such as OpenStreetMap (OSM) and satellite ground planes can provide some context for your design. They are suitable options for quickly building urban or rural environments relevant to your project’s location, but they’re also limited. For instance, OSM only provides rough building shapes, rendered white, and the satellite maps are flat, often outdated, and the resolution is too low for client visualization.

NYC skyline with context provided by OpenStreetMap, rendered in Lumion 8.3. Image Courtesy of Lumion

This all got me thinking—there has to be a better way to improve fast context-building without having to sacrifice photorealism. I investigated several options, starting with Google Maps and Google Earth SDKs, but these services do not allow their data to be used outside the scope of Google Maps and Google Earth, such as for architectural visualization.

One solution is to create a 3D model of the environment using a series of photographs taken by a drone. This technique is sometimes used at construction sites to monitor progress, but it is not yet widely used for architecture design and visualization.

To test its viability, we used a drone-to-3D workflow for several real-life design projects. From our experiences, we derived a workflow simple enough to be used by architects (and not only 3D specialists). Using a modern drone and the software RealityCapture, it is now possible to capture an area of 300 x 300 meters and create a textured 3D model of sufficient quality for presenting a realistic background for your Lumion visualization.

Oh, and you can do all of this in one day. 

Workflow Summary

This summary is a condensed version. Click here for the full drone-to-3D workflow story (PDF).

Step 1: Buy a Drone

Drones are getting cheaper, smaller and increasingly powerful by the minute. For this workflow, I used the DJI Mavic Air. It costs $800, weighs less than half a kilogram and it can fly for 20 minutes on one battery. The DJI Mavic Air can also cover a distance of 10 kilometers and make 4K video and 4000 x 3000 images with good resolution. This is adequate for our purpose of creating 3D environments as a backdrop for architecture design or visualization.

10-inch tablet and tablet holder next to the DJI Mavic Air. Image Courtesy of Lumion

Also, I’d recommend that you buy some extra drone batteries and, if needed, a 10-inch Android tablet.

Step 2: Capture Drone Images

Using a special app on your tablet for controlling a drone such as Drone Harmony, the second step is to capture images around the area of interest.

The Drone Harmony app lets you draw the area of interest on a map, and then it calculates the flight path of the drone, capturing images automatically with a 60% overlap from the previous shot. This overlap is needed for automatic 3D model construction.

Example flight path in Drone Harmony. Image Courtesy of Lumion

Do five runs of the same flight path above the desired area, but make sure you assign a different camera angle for each flight. For instance, you can fly the first run with the camera pointed down and the other four runs with the camera tilted at 45 degrees. Each run takes 7 to 15 minutes, so the entire flying will take about 1 to 1.5 hours overall.

Step 3: Enter images into RealityCapture (RC)

While there are many different software programs for compiling drone images into a 3D model, I found RealityCapture to be the best option. RealityCapture automatically aligns all of the images and then creates a 3D model, adds textures, and inspects the model’s quality. This literally takes a few minutes of manual work, and a few hours at most of background processing by the RealityCapture software.

Constructed 3D model after RC aligned and processed the images from your drone flights. Image Courtesy of Lumion

Step 4: Cut out the less-detailed areas and unwanted objects

If the quality of the model is OK, the next step is to cut out the less-detailed areas and unwanted objects and then simplify the 3D model to a smaller model. Depending on the model’s size and complexity, this can be anything between 30 thousand and 1 million triangles.

Cut out a specific area where you will insert your CAD building or spaces. Image Courtesy of Lumion

Texture the model again and export it in an FBX format. Cutting and simplifying the model takes between 20 minutes and one hour.

Step 5: Import the model into Lumion

After importing the 3D drone model into Lumion, you can dress it up with trees, cars, people, furniture, etc. You can also import your design from SketchUp or your CAD/BIM program (Revit, 3ds Max, AutoCAD, Rhino, etc) on a separate layer, and make renders and animations.

Westpoint Apeldoorn Project, rendered in Lumion 8.5 after going through the drone-to-3D workflow. Image Courtesy of Lumion

This typically takes anywhere between 15 minutes and several hours.

If you want the full story, with detailed information and tons of great images and videos, check out the full Drone-to-3D workflow (PDF).

Testing the Workflow on Real-Life Projects

I used this workflow for several projects. One was a test project of a beach and dune area featuring an existing Lumion example house. The remaining two were commercial design projects from local architects. These are briefly described in the next sections.

Beach and Dune Area

Courtesy of Lumion

Test project. Existing Lumion beach bungalow added to a 500 x 500-meter captured beach area near The Hague, The Netherlands. (Download this Lumion Project)

Nesselande Project / Studio Aaan

Courtesy of Studio Aaan

Private house design on a small island in a new residential area near Rotterdam, The Netherlands. 

Courtesy of Studio Aaan

From architect Hilbrand Wanders of Studio Aaan: "Only once a house is finished and the owners move in, one can precisely see how certain trees are creating shadows in the house, what objects in the surroundings are blocking views from a certain position, or how window openings are positioned relative to window openings of the surrounding buildings. These aspects are highly influential on the living qualities and are difficult and too time-consuming to model by hand completely early in the design process. It is very interesting for a designer to consider the correct 3D environment from the first moment on, to test the first design-ideas within a correct 3D surroundings, but also to communicate these to a client in a very clear and tempting format."

Courtesy of Studio Aaan
Paul Spaltman’s design of a refurbished office building in Apeldoorn, The Netherlands. Image Courtesy of Lumion

Westpoint Apeldoorn Project / Paul Spaltman

Another aerial render showing city context created from the Drone-to-3D workflow. Image Courtesy of Lumion
Front of the Westpoint Apeldoorn Project. Image Courtesy of Lumion

Refurbishment of an existing office building into 98 apartments, each with a balcony, in Apeldoorn, The Netherlands.

From architect Paul Spaltman: "The fact that my design was embedded so clearly in the environment is an added value, not only during the design, but also during presentations and discussions with the customers, governments, and local citizens or whoever is involved."

Courtesy of Lumion

Cost Overview

The following table sums up the software and hardware components I used. Other components may be needed, with additional costs, as well:

Creating Your Own 3D Environments with Drones

My experiences have shown that creating 3D environment models from drone images is very straightforward and feasible for any architecture design visualization.

The investment in time and money is relatively low, and any architect can do it without extensive training and/or the need for a 3rd-party service provider. The resulting models have value both in the design process (Lumion LiveSync) and for communicating with clients and other interest parties, like the city council and local citizens (Lumion rendered images and animations).

Image gallery

See allShow less
About this author
Cite: Pjotr van Schothorst, Lumion. "How to Use a Drone to Create a Detailed 3D Context Model" 23 Aug 2018. ArchDaily. Accessed . <https://www.archdaily.com/899196/how-to-use-a-drone-to-create-a-detailed-3d-context-model> ISSN 0719-8884

You've started following your first account!

Did you know?

You'll now receive updates based on what you follow! Personalize your stream and start following your favorite authors, offices and users.