Knowing where your building will be constructed is essential as it shows you the impact it will have on its surroundings and vice versa. Enscape's latest software release, version 3.3, includes the Site Context feature which lets you add real-world context to your design scenes by utilizing OpenStreetMap data.
The Site Context feature is a site model of an area where a building is placed. It includes low poly buildings, streets, and topography which can be imported into your project to facilitate architectural visualization. Once imported, the site context model will only appear in your Enscape viewport and not in your chosen CAD software.
Here's an overview of how you can add context to your design scene.
Adding Site Context
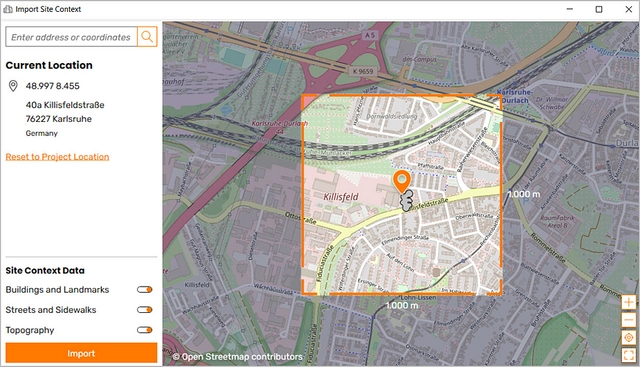
To open the site context feature, click on the linked button in the Enscape Viewport Toolbar or press the shortcut key [O]. The Site Context panel will open to the left of the Enscape Viewport. Select the Add Site Context button located in the side panel. A window will open once you've clicked on the button. It will have the following information:
- Search – Enter an address or coordinates
- Current Location – Find the chosen location of the pin on the map
- Site Context Data – Toggle the visibility of parts of the site model
- Map and current area – An adjustable orange box marks the current area
- Zoom, Go to Location, and Fit to Location – Refine or reposition the location
- Import – Import site models from OpenStreetMap
You can change the default location set by your host CAD application by searching for the street name, city, postal code, or coordinates of your preferred location. Select your desired location by pressing [Enter].

Importing Site Context
The area and position of the model can be defined once the location has been established. A default area of 1000m x 1000m is set. The following options are available when defining the site area:
- Resize – drag one of the sides of the orange bounding box that defines the area intended to be imported. The size is indicated in meters.
- Rotation – hover the mouse cursor near a corner until it changes, at which point you can click on the corner and rotate the area by moving your mouse.
- Translate – move the pin to the desired location and click on Fit to Location.
The orange pin icon in the map indicates where your CAD model will be placed in the Site Context model once imported. The location of the CAD model can be translated or rotated by dragging the pin or hovering on the circular arrow symbol. The position of the site model can be updated once imported. In the lower-left corner of the map viewport, you will find the following buttons:
- Zoom tools (+, –) – This allows you to zoom in and out (or use the mouse wheel).
- Go to Location – This centers the map on the pin location.
- Fit to Location – This centers the area selection around the pin and sets its dimensions to 1km x 1km.
| TIP: The minimum size of an area is 100m x 100m. The maximum is 9999m x 9999m. Setting an area greater than 5000m x 5000m will prompt a warning. |
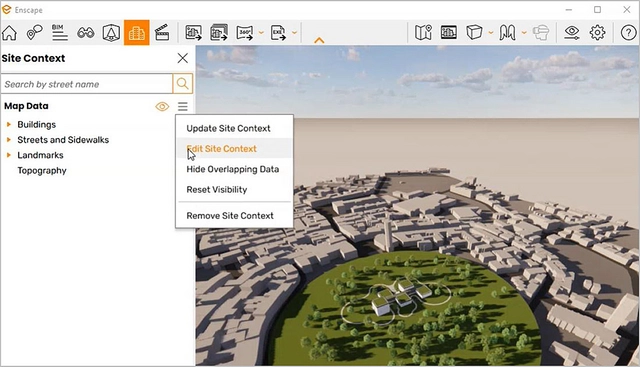
Site Context Data
Located at the base of the Site Context panel are the data options which can be toggled on and off to control the visibility of Buildings and Landmarks, Streets and Sidewalks, and Topography.
The Buildings and Landmarks and Streets and Sidewalks options can be toggled off completely or individually from the menu. You can also do this by right-clicking on elements directly in the Enscape Viewport and clicking on Hide Selection.
Map Data Options
Clicking on the Hamburger menu icon next to Map Data will provide a menu with the following options:
- Update Site Context – This will open the initial Site Context window, enabling you to update the location and imported area.
- Edit Site Context – This allows repositioning of the site model via horizontal and vertical translation and rotation.
- Hide Overlapping Data – This hides any Site Context model data that overlaps with the CAD model.
- Reset Visibility – This makes any hidden data visible again.
- Remove Site Context – This removes your project's current Site Context model.
| TIP: The CAD model's lowest point will be used as the base touchpoint with the Site Context geometry. So, if you find your CAD model floating above the Site Context model, you can either move the whole Site Context model vertically using the translate tool or check and adjust the CAD model for possible extruding geometry (for example, sub-surface geometry elements). |
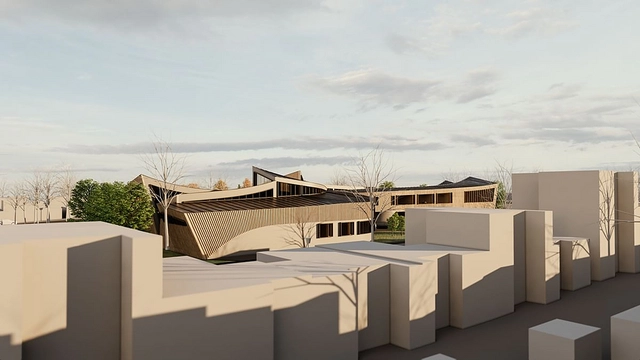
Placing Assets
Enscape Assets and Custom Assets can be placed on the Site Context model. Surfaces in the Site Context model that can accommodate asset placement are topography, streets, and the tops of buildings.
| TIP: The topography needs to be visible to place assets on it. To do this, ensure it's toggled. Selecting topography to place assets on via the bucket tool will consider the whole Site Context model which can result in potential performance impacts. |
For a full summary of how to get the best out of the Site Context feature, visit the Enscape Knowledge Base.
Get Started with Enscape
Enscape plugs into Revit, SketchUp, Rhino, Archicad, and Vectorworks. Update to the latest Enscape 3.3 version to enjoy the new features or sign up for a free 14-day trial if you haven’t already experienced it yourself.


