Sharing your designs is one of the most important parts of the design process. Presenting your work to clients or with team members during design evaluations should be done with ease. This is exactly what Enscape’s Standalone Executable and Web Standalone exports offer.
In this article, you will learn the best practices when it comes to exporting a Standalone Executable and Web Standalone with your favorite real-time rendering plugin.
How to export a Standalone Executable
Using this function enables you to export the current Enscape model into a Standalone Executable. The .exe file gives you the same quality and experience without requiring Enscape or the CAD/BIM to run. It demands the same system requirements as Enscape, and all standalone files are VR compatible.
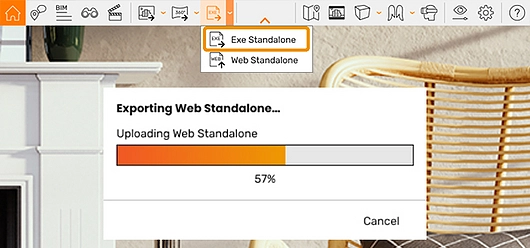
To export your Enscape model, first and foremost, make sure Enscape is running. Then, click the Export button or click on the small arrow next to it and choose the Exe Standalone option.
You will then be asked to specify the location you want to export the Exe Standalone to. Once chosen, the export will begin, and an export process bar should pop up.
You can get a free sample Standalone Executable here.
Managing your settings
Any setting that was active while exporting the Standalone Executable will be included in the export, except for virtual reality. Several settings can be adjusted within the Standalone; however, they cannot be saved. Within the integrated Settings menu, you can adjust settings in the following categories:
- Visual
- Input
- Devices
- Performance
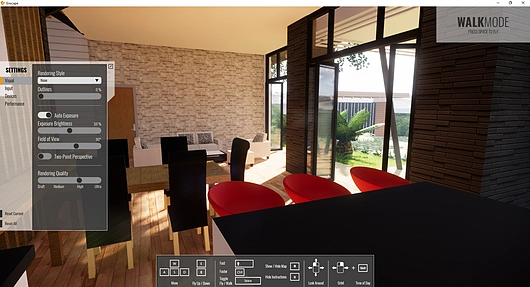
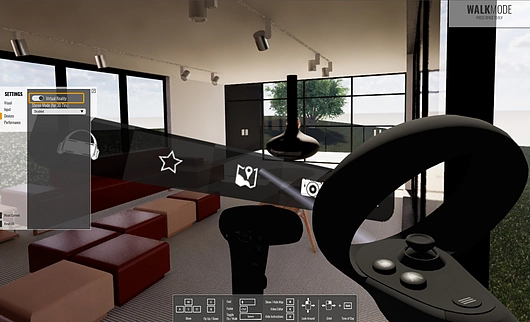
The tab to open the Settings menu is located on the left-hand side of the screen. When hidden, only a translucent bar will appear. To expand this, simply hover your cursor over the tab. To keep the menu open while you move around, click on the pin icon. Clicking it again closes the menu.
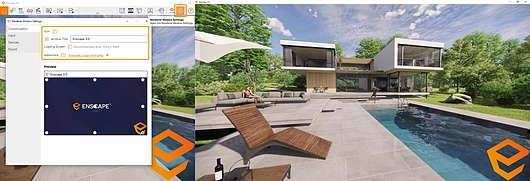
To manage Customization feature settings, go to the Renderer Window Settings dialog, which is located under the Customization tab. Here is where you can define your own loading screen, watermark, window icon, and window title.
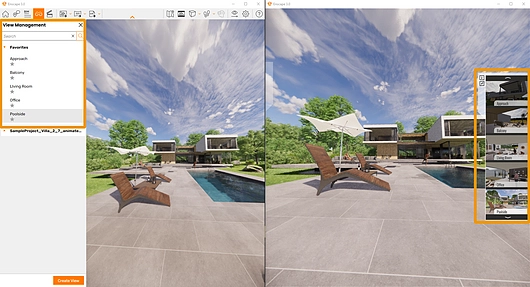
Favorite views and virtual reality
Views that have been marked as favorite in Enscape will be included in the Standalone Executable. The Favorite Views menu is found on the right-hand side of the screen. It opens the same way as the Settings menu, by hovering your cursor over the translucent tab.
Clicking on the thumbnail preview will smoothly transport you to that location in the model, and a double click will transport you directly to the desired spot. The Views are exported with the Time of Day settings defined in each View prior to export.
To use virtual reality with your Standalone, simply enable it by selecting it in the Devices option in the integrated Settings menu. The machine that the model is being viewed on must fulfill Enscape’s virtual reality system requirements.
For more info on how to use the Standalone Executable, visit Enscape’s Knowledge Base.
How to export a Web Standalone
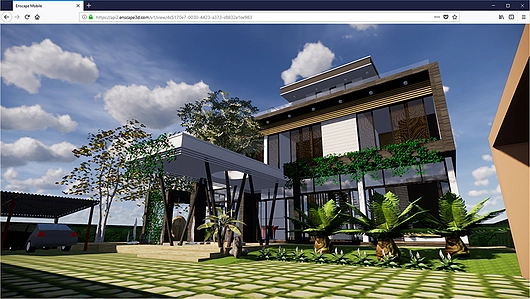
Enscape’s Web Standalone removes the need for a high-end graphics card. This is because the Web Standalone export is rendered in the browser using WebGL 2.0. The Export Web Standalone button is available within the toolbar in the Enscape viewport.
To get started, click the small arrow next to the Executable Standalone to reveal a drop-down menu where the Web Standalone option is located. A dialog box opening will show up which indicates the upload progress of the upload of the export.
Once the server has finished processing the data, your default browser will open. When the Standalone has loaded into your browser, it will automatically display your project from the same position as was showing in the Enscape window.
Exporting tips
Here are some tips on how to get the best out of your Web Standalone export.
- The Help Overlay automatically appears when the Web Standalone is opened. You can toggle it on and off using the H key on your keyboard.
- Movement in any direction can be controlled on your keyboard via the arrow keys, and the E and Q keys to move up and down.
- To help increase movement speed, hold the Shift key. To speed it up even more, hold the CRTL key. Toggle between Fly and Walk mode with the spacebar. Pressing M turns the mini map on and off.
- To rotate the view, click in the window with your left mouse key and drag in the desired direction.
- To adjust the Time of Day, press shift and hold the right mouse key and move the mouse.
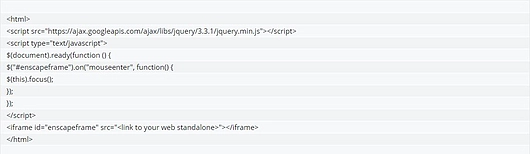
- You can embed the Web Standalone into your own webpage. This can be done by embedding the URL into an iframe using the following script in your webpage:
For more info on how to use the Web Standalone Export, visit Enscape’s Knowledge Base.
Managing your uploads
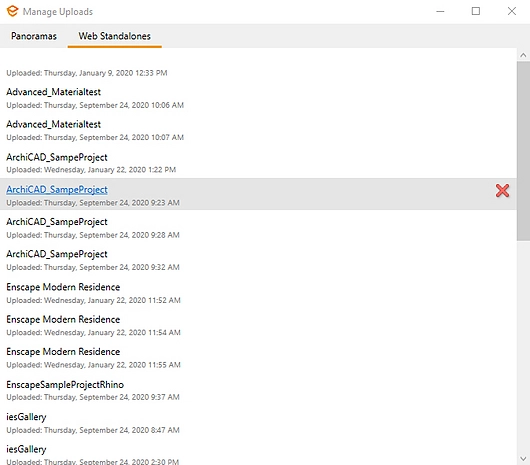
If you want to share, move, rename, or delete Web Standalone files, you can do so via the Manage Uploads dialog within Enscape. This is accessed via the CAD/BIM toolbar button.
To administer your files via the CAD/BIM, click on the My Uploads button in the Enscape ribbon. Once clicked, a new window will open with a tab named Web Standalones. Click on the tab and you will see a list of all the Web Standalones that you have created.
From there you can click on a title to open the Standalone file in your browser, or you can click the red X to delete it.
For more info on how to further manage Web Standalone files and how to access them via the Enscape License Center, visit the Enscape Knowledge Base.
Free Trial Version
Enscape offers a 14-day free trial. Visit and discover Enscape here.


