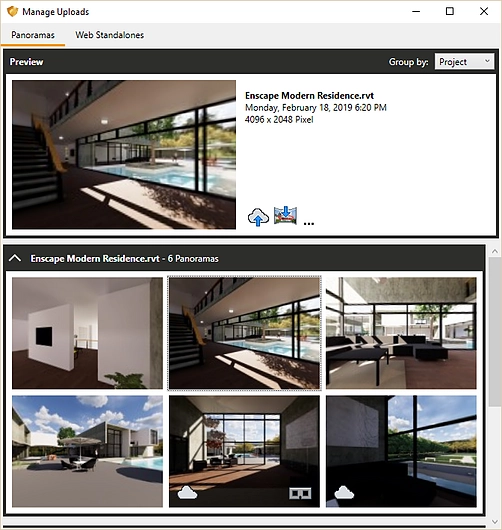
Panoramas are multifaceted tools when it comes to presenting a project and It can be effortless to integrate them into every step of a workflow. Integrating Enscape panoramas into building plans, presentations, or promotional material couldn’t be easier; they are easy to send, access, and view.
Panoramas can often be a happy medium between still renderings and a full 3D walkthrough. They make a great addition to still renderings, giving clients the ability to literally take a look around. Viewing them doesn’t require high powered hardware; you can have a VR experience using a smartphone. It’s effortless to upload them to the cloud and share them via weblink or QR code.
The Planning Process
Many Enscape users add panoramas to every step of their workflow, starting during the planning phase. Before beginning construction on a project, you can show a client exactly what the end result will look like. It just takes a few clicks to export a panorama that you can send to a client in seconds. Any view in Enscape can be exported as a panorama.
Enscape forum user Paul Russam (David Maxwell Architects) detailed his workflow for exporting all of his panoramas from one project in a recent forum post:
- First, start Enscape and survey the model for the best views of the project.
- Save these views and name them “Pano-01, Pano-02, Pano-03 etc” for easy reference.
- Render outdoor scenes as panoramas first
- The indoor scenes are rendered last; this process allows exposure settings to be tailored first for the outdoor scenes, then the indoor views, for the best result.
Using a workflow like this will leave you with a collection of panoramas which are a great way to present a project.
The great advantage of panoramas is that they provide the opportunity of a VR-like experience using minimal hardware. Travel light by saving panoramas on a tablet and showing them during key points in your presentation. A client can swipe around the panorama using their finger, allowing them to focus on the areas that are most important to them. Or view the panoramas on any laptop, navigating with the cursor. Alternatively, upload your panorama to the cloud and download a QR code. You can add these to posters and quickly scan them at the right moment, provided you have internet access, of course.
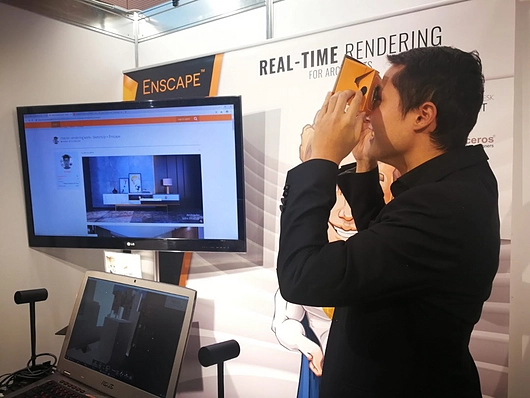
Another great tool to use in combination with stereo panoramas during a presentation is a cardboard device. This adds an interactive, and therefore memorable, element to the presentation, with no extra fuss. You might not always be able to bring a full VR setup to client presentations, but you always have room for a cardboard device. It assembles in seconds; after that you simply open the panorama on a smartphone and enable cardboard mode by tapping the glasses icon in the lower right hand corner of the screen. This gives a client a fully 360° experience of their project in seconds.
Between presentations, sending panoramas is a great way to keep your client up-to-date on progress. This is in no small part due to how easy it is to distribute panoramas. You can of course send your client the image file to view on their computer, but you can also simply send a weblink that they can open on their smartphone and view anywhere.
The opportunity for immediate feedback is what makes using panoramas like this so powerful. You have the ability to give your client an impulse of where the project is heading, and immediately react to their response, saving you not only time but also headaches down the line.
The Construction Phase
It can be easy to write off panoramas once you leave the planning phase and enter construction, but a survey of Enscape forum users shows that this is where you can really get creative. This benefits not only clients, but also the workers. This is where panoramas distributed via QR code can be most useful. Once the floorplans are ready, navigate the model in Enscape and export panoramas of key areas. Then simply upload these to the cloud and download the dedicated QR code. Adding this QR code directly to the floorplan can bring clarity to the design and help you avoid miscommunications about the direction of the project.
Adding panoramas to 2D plans brings your project to life like never before. A 2D plan can convey the basic facts of your project, but it can’t tell a story the way a rendering can.
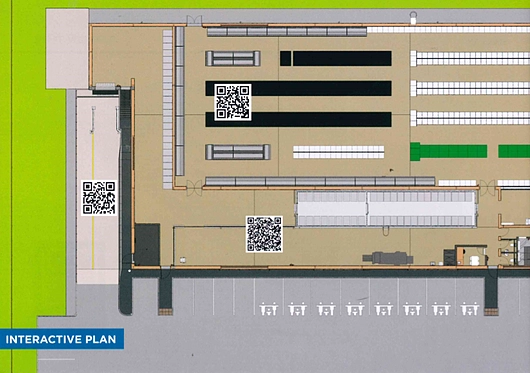
Combine the detail of a 2D plan with the imagery of a 360 panorama viewed immediately on a smartphone for a clear, comprehensible overall representation of the project. Printing QR codes in brochures to send out gives your project an even greater reach: anyone with a smartphone can see the idea in seconds.
Marketing and Promotion
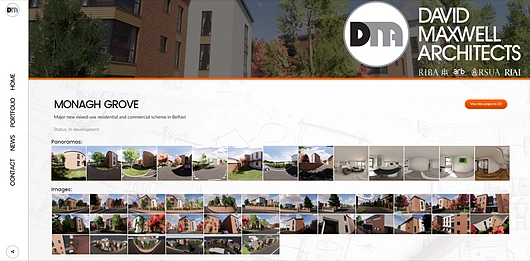
Panoramas can benefit a firm beyond the development of specific projects. They can also be an invaluable tool to convey an ability to potential clients. Collecting panoramas of past projects is a great way to immediately showcase design style. The most straightforward way to do this is to host panoramas of past projects on a website.
Another easy way to host panoramas and reach a wide audience is via Facebook’s 360 photo upload. It is just as easy as uploading a normal photo to Facebook, but allows the viewer to pan around the image with one click or tap. Just upload the panorama as if it were a normal picture and Facebook will automatically recognize it as a 360 photo. You can then set your starting view and post to your timeline with one click.
A great way to take QR codes up another notch is to personalize them to fit with corporate identity. The QR codes that Enscape generates are functional and effective, but sometimes you might need something less nondescript. In this case, online QR code generators are perfect tools. Simply upload your panorama to the cloud to assign it a weblink. Then pick your favorite QR code generator. Drop in the URL from Enscape and these personalized QR codes will link directly to your panorama.
One last way to integrate panoramas into marketing materials is by creating a panorama tour. This is obviously also great for client presentations or during the planning stage, and hosting a panorama tour on a website makes a great first impression on potential clients. Not only does this give a similar effect to a real-time walkthrough, but many softwares and services allow you to also annotate the panorama tour; the viewer can then click selected elements and get more information.
There are a lot of different services out there that allow you to create such tours. Many are only available in a paid subscription but create such beautiful tours that it might be an investment worth considering. At the top of the list are 3DVista, RoundMe, krpano, and Modelo.
There are also two great free tools that allow you to create panorama tours at no cost. The first is Pannellum, a versatile tool: on the one hand, you can use it to simply annotate single panoramas, to add more detail or information. On the other hand, you can create linked tours to give the viewer a full experience of the project. It is perhaps a little complicated at first to get the hang of, but the site offers lots of documentation and a detailed tutorial to get you started.


