Adding 3D models to a project is a great way to take it to the next level and really impress clients; it can make all the difference during a presentation. But carefully considering the composition of your scenes can be time-consuming – and that’s assuming you have already found your models. Enscape’s Asset Library takes all the effort out of locating models for a project.
The handy tool saves you time by delivering 3D-ready models of people, vegetation, furniture and more for projects in Revit, SketchUp, Rhino and ArchiCAD. The Enscape-ready assets can be added to a project in seconds, simplifying workflow immediately. The right tree or figure is now right at your fingertips.
How to use the Asset Library
The Asset Library can be opened via the Enscape dropdown menu or via the Asset Library icon, depending on the CAD program.
The Asset Library will open in as a separate window and show all available assets grouped by category. Click on a category to see the available assets. When you hover your mouse over an asset, you will see its name and a short description. At the top left, you can also search for specific assets by name.
You can also favorite assets so that they appear together in the Favorite category. To add an asset to this category, simply hover the mouse over the desired asset and click the star in the left corner. The asset will automatically appear in the Favorite category. Any favorites will be saved after you close your CAD program. Click the star again to remove an asset from the Favorite category.
Select an asset to place in your project by simply clicking on it. While you are placing the asset in the CAD program, the Library window will minimize, and return when you have finished the placement. You can also press the Esc key on your keyboard at any time during placement to abandon the asset and return to the Library window.
Best Practices in Revit
The easiest way to add an asset in Revit is to place it in a floor plan view. Select the appropriate level and the asset you want to place by clicking on it. The Library window will automatically minimize and your cursor will allow you to place the asset. Just click once to place the asset exactly where you want it. The Library window will open again and you will see the asset in Revit, represented as low-res geometry.
The great benefit of the Asset Library is how quickly it is possible to create scenes. Being able to add assets with two clicks streamlines workflow and saves valuable time.
Best Practices in SketchUp
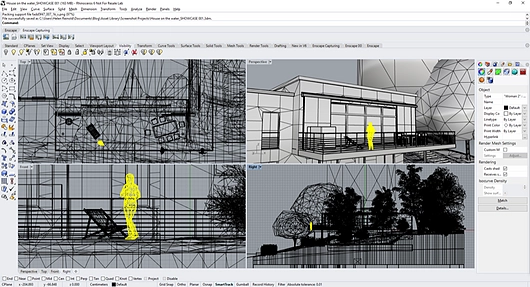
It’s just as painless to place assets in SketchUp; select an asset from the Library window and place it with one click on the desired face. If Live Update is enabled, the asset will immediately become visible in the Enscape window. The asset will be shown as a white, low-res figure. After you place an asset in SketchUp, you will be able to continue placing the same asset in a batch. This is a great way to add many assets subsequently and keep your project size small. Pressing the Esc key will recall the Asset Library window.
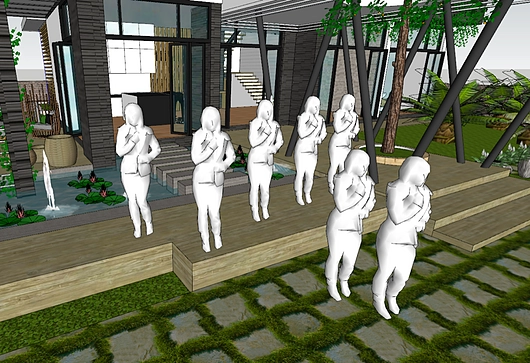
Previously Enscape offered 10 RPCs, which were only available for Revit. The new library, however, expands this number to 18 and makes the figures available in all four supported CAD programs. Use them to really bring scenes to life. No matter which program you use, Enscape assets can take your scene from empty to bustling.
Best Practices in Rhino
In Rhino, you can place assets in any of Rhino’s Viewports. Select the asset from the Library window by clicking on it. Rhino will ask you to select a target surface, or alternatively you can press the Enter key to use the base plane. After that, your cursor will allow you to place the asset on a surface by clicking once.
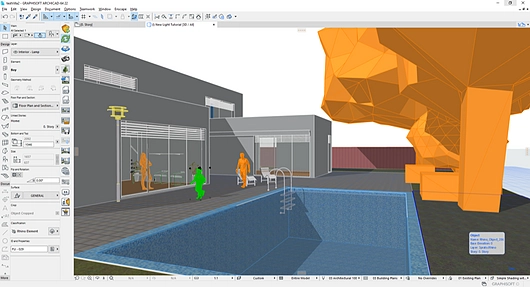
Best Practices in ArchiCAD
In ArchiCAD, you can access the Library through the Enscape dropdown menu or via the ribbon. Open the Library and select the asset you want to place in your scene. The cursor will change to allow you to place the asset; click once to add it to your scene. In ArchiCAD, the assets are represented as orange, low-res geometry. You can also rotate, elevate or drag the asset after it has been placed using the native ArchiCAD Move functions.